Roof flashing is essential to any roofing system as it prevents water from seeping into your home through joints and seams. It also protects your home from the rain by directing rainwater away from the corners of your roof’s chimneys, outflow vents, skylights, and edges. On the other hand, lousy roof flashing can lead to significant water damage with just a tiny leak, weakening the structural integrity of your house and allowing mold to set in.
Whether constructing a new house or maintaining an existing one, one should be fully conversant with roof flashing for investment protection. This guide will focus on roof flashing: its purpose, available types, materials installation tips, and maintenance methods.
What is Roof Flashing?

Roof flashing is a thin, waterproof material installed at various points on a roof to prevent water from infiltrating a structure. The sealant is often placed around joints, seams, and all points where different roofing surfaces meet, such as chimneys, skylights, vents, valleys, and edges. By directing water away from these vulnerable areas, roof flashing helps protect the roof and its underlying materials from leaks and water damage.
Flashes are generally developed from resilient materials, usually galvanized steel, aluminum, copper, or rubber, which means they are highly resistant to weather conditions and temperature differences. A correctly installed roof flashing will significantly enhance the roofing system’s function. First, it extends the life of the entire roof but also saves owners from structural issues and costly repairs.
Importance of Roof Flashing in Protecting Your Home
Roof flashing protects a house from water infiltrations at the most vulnerable points within the roof. Initially, it prevents seepage through joints, seams, and intersections, such as those around chimneys, skylights, valleys, and vent pipes, where water can infiltrate.
If left to continue, the leak slowly deteriorates wood, invites mold, and can destroy ceilings and walls from the inside out very costly repair. By redirecting water away from critical points, roof flashing protects the roof’s integrity and bolsters it to hold up under inclement weather, such as heavy rain, snow, and ice.
Common Types of Roof Flashing
- Step Flashing: This is the flashing used along edges, such as where a roof abuts a wall or around chimneys or dormers, and is commonly used in residential roofing. I-shaped pieces overlap in a “step” pattern to direct water away from the wall and down the roof.
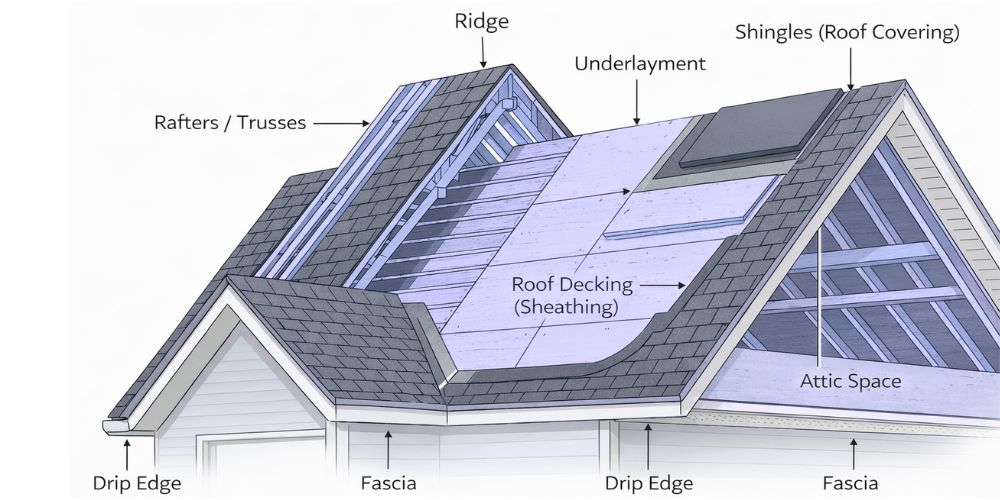
- Drip Edge Flashing: Flashing is installed along the roof’s edges, guiding water away from the fascia and into the gutters. Drip edge flashing is Suitable for both residential and commercial roofing. It avoids water seepage underneath the shingles, which could affect the underlying roof deck.
- Valley Flashing: In any spot where two roof planes intersect, forming a valley, this kind of flashing is designed to channel rainwater down the roofs into the gutters, preventing any pooling that might make the place susceptible to leaks.
- Vent Pipe Flashing: It is installed around all points in a roof, such as the pipes or vents that emerge from it; it is also called boot flashing. It must be fitted to ensure that it is watertight to avoid leaks.
Different Types of Roof Flashing Materials
- Aluminum Flashing: Aluminum is a commonly used material for flashing. It is lightweight, easy to handle, and simple to work with. It does not rust or corrode and can be easily bent to fit the shape of the roof accurately and quickly. However, coating is required in coastal or industrial areas.
- Copper Flashing: Copper flashing is highly durable and adds an aesthetic feature to a building. It is one of the longest-living materials in flashing and resists corrosion thus, it is usually applied on high-end or historic buildings. Copper flashes are said to gain an attractive patina that develops over time and enhances the overall aesthetics of a building while maintaining protection continuously.
- Galvanized Steel Flashing: Galvanized steel flashing is produced from steel with a layer of zinc coating. This type of material provides excellent durability and ensures rust resistance. Because of its low cost and textual strength, flashing is commonly utilized. It may also require periodic maintenance to prevent the onset of corrosion following degradation of the galvanized coating over time.
- Rubber Flashing: Most common around pipes and vents, rubber flashing provides a flexible, watertight seal. It is relatively easy to install but may not last as long as metal options.
Also Read: Guide to Choosing the Best Roofing Materials?
Roof Flashing Sizes
- Standard Step Flashing Size: The standard step flashing size is 5 inches by 7 inches, which is used every day in residential roofs. This allows for enough overlap as it meets over the same place on walls or chimneys for the joint of water away from the joints.
- Drip Edge Flashing Size: It is generally made in different widths, such as 2.5 to 4 inches, with an extended flange underneath the shingles. Its size varies according to the roof slope and water runoff but sufficiently protects the edges.
- Valley Flashing Width: This usually ranges from 12 to 24 inches. In areas with heavy rainfall, wider flashings are used to efficiently drain the water along the roof’s valleys, reducing the chances of water leakage.
- Vent Pipe Flashing Size: These are all sized to fit 1.5—to 4-inch diameter pipes. They are constructed in a cone shape for a tight fit with many pipe diameters.
How to Install Roof Flashing?
Several actions are crucial in installing roof flashing to ensure watertight and adequate leak protection. First, clean the site area where the flashing is to be installed by getting rid of all debris. Start by placing one piece at the edge for a step flashing, overlapping the shingle beneath it. Secure it with roofing nails, ensuring the flashing bends toward the roof-to-wall flashing. Continue to install the remaining pieces in a “step” fashion, each overlapping to direct water to continue down and away from the structure.
Wrap the flashing around the base for either chimney or vent flashing, ensuring that nails or adhesives are closely together to keep it tight. Counter the step flashing for added protection. Cement any gaps and eliminate any possible pathways for water to penetrate. Lastly, verify the proper installation overlaps and coverage, with all edges sealed and secured to maintain serviceability.
Signs of Damaged Roof Flashing
- Water leaks inside the House are typically some of the most identifiable signs. Discolorations on the ceiling or wall signal that water has been leaking through because of damaged or missing flashing.
- Visible Rust or Corrosion: When the flashing material shows evident rust or corrosion, it signals that the protective coating has worn away and opens up the flashing to water intrusion.
- Cracks or Holes in Flashings: These are the physical types of damage that form cracks, holes, or splits in flashings, allowing water to seep inside and structure the roof.
- Lost/misplaced flashing pieces: Flashings that were dislodged or fell off the roof due to high winds, storms, or poor installation can expose the roof to water damage.
Maintenance Tips for Roof Flashing
- Regular Inspections: The roof flashing shall be inspected at least twice a year and every time after significant storms. It must be checked for rust, corrosion, or any physical damage that would precondition its efficiency and replaced immediately.
- Clean off debris from the roof: Leaves, dirt, and other kinds of debris that accumulate on the roof and gutters give way to moisture accumulation around flashing, hence causing rust or any leaks over time.
- Seal small gaps and cracks: Apply a small amount of roofing cement or caulk to seal minor gaps, cracks, or loose edges in flashing. This will help prevent water seepage behind the flashing and further destruction.
- Reapplication of Protective Coatings: Metal flashings should be reapplied with a waterproof coating or painted to prevent rust and extend their life, especially in conditions of high rainfall or salty air from the coast.
Also Read: Which Roofing Material Has The Longest Lifespan?
Conclusion
Roof flashing represents the barrier in a robust and watertight roofing system. It protects your home by sealing off weak points and directing water away from the more sensitive areas at chimneys, vents, and valleys.
Knowing what types of flashing, with what materials and sizes, and the correct installation techniques will keep your roof in great shape. In addition, regular inspections and proper maintenance will be needed to avoid premature wear and increase the life span of the roofing.
If you observe flashing issues or require professional installation and roof flashing repair service for your roof, contact Mangold Roofing without delay. For decades, we have provided quality services that provide actual roofing to protect your house from water exposure.


