The first cold rain of the season rolls through, and a few days later a brown stain is spreading across the bedroom ceiling. Nothing looked wrong from the street, so you never gave the roof a second thought.
Metal roofs last a long time, but they are not maintenance-free. Most problems start small, like a screw backing out or a strip of sealant drying up, and they usually give warning signs well before anything leaks inside.
A metal roof inspection can help identify signs of damage, loose fasteners, and other issues before they become more serious. This guide explains what to check, how to inspect your roof safely from the ground, and when to call a San Antonio roofing professional.
Why Fall Is the Right Time to Inspect a Metal Roof
Summer in San Antonio is hard on a roof. Weeks of triple-digit heat make metal panels expand and contract every single day, and that movement can work screws loose and dry out sealant. Add a spring hailstorm or a few gusty summer storms, and your roof may have taken a beating you have not seen yet.
A seasonal inspection can help you identify damage while it is still manageable and arrange repairs before the problem gets worse. Checking your roof before periods of severe weather can also help you prepare for changing conditions.
If you suspect storm damage, check your policy and contact your insurer promptly. Claim reporting deadlines and requirements vary by policy. Keep dated photos and inspection records to document the roof’s condition.
As temperatures drop, metal panels contract, and any existing weakness around a seam or fastener may become more noticeable. Checking these areas can help identify problems that need attention.
Can You Inspect a Metal Roof Yourself?
Partly, yes. A ground-level review can help you spot visible signs of damage, and you do not need to climb onto the roof to get useful information.
Here is a simple two-level approach:
- From the ground: Use binoculars and your phone camera to look over the panels, eaves, and roof edges.
- From the inside: Check the attic, if safely accessible, or look at the ceilings below the roof for stains, damp insulation, or daylight.
A ground-level review is only a preliminary check. From the ground, you may not be able to see damaged washers, sealant hidden inside panel overlaps, or every flashing detail around roof penetrations. A more complete inspection may require a qualified roofing professional who can assess these areas safely.
Avoid walking on the roof yourself. Metal panels can become slippery, especially with morning dew or pollen. Walking on them may also dent the surface or damage the locks on standing seam panels, potentially creating problems with some manufacturer warranties.
If your roof is steep, your home has more than one story, or you notice signs of a leak but cannot identify the source, contact a roofing professional. A ground-level check is a useful starting point, but it cannot confirm the condition of every roof component.
Metal Roof Inspection Checklist
A complete metal roof inspection covers six areas: the panels, the fasteners, the seams, the flashing, the valleys and low spots, and the space under the roof. You will not find a problem in every area, but skipping one can mean missing the real source of a leak. Use the table below as a quick reference, then read the sections that follow for what each item actually looks like.
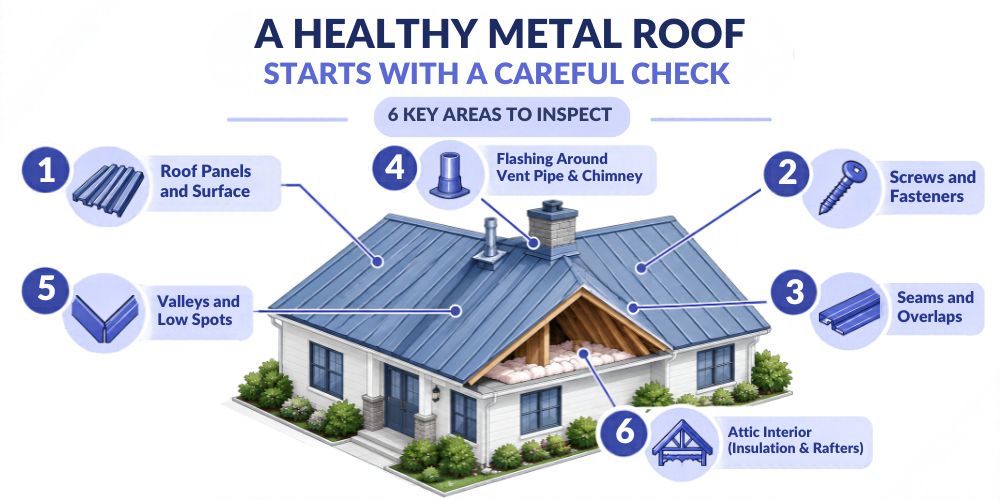
| Area | What to Check | Red Flags |
| Panels and surface | Alignment, coating, dents, rust | Scratches exposing bare metal, hail dents, buckling |
| Fasteners and screws | Screw heads, rubber washers, rust rings | Backed-out screws, cracked washers, rust streaks |
| Seams and overlaps | Sealant, panel laps, ridge cap | Separated sealant, lifted seam edges |
| Flashing and penetrations | Pipe boots, chimney, vents, wall flashing | Cracked caulk, lifted flashing, rust around cutouts |
| Valleys, eaves, and low spots | Debris, standing water, valley channels, eave edges | Ponding, debris buildup, rust in valleys, reactive metal contact |
| Interior and attic | Decking, insulation, framing | Water stains, daylight gaps, wet insulation |
Take your phone along and photograph anything that looks off. Dated photos help if you later need a contractor’s opinion or an insurance record.
1. Exterior Panels and Surface
Start by walking the perimeter of your home and looking at the roof from a few different angles. Panels that look straight from the front yard can show waviness or lifted edges when you see them from the side.
Bring binoculars and scan for rust spots, deep scratches that go through the paint coating, dents, and any panel that looks buckled or out of line. A scratch that exposes bare metal is where rust tends to start. It is not an emergency, but write it down.
Hail dents can be hard to spot, especially on standing seam panels. Look closely at the panel surface in raking light, early morning or late afternoon, when the sun hits at a low angle and makes dents and dimples easier to see.
You may also notice a wavy look in the flat part of a panel. That is called oil canning on a metal roof, and it is usually just cosmetic, not a sign the roof is failing. Keep an eye on it, but do not panic.
Red flags to look for:
- Rust spreading out from a scratch or a fastener (here is what rust on a metal roof means)
- Visible holes or punctures
- Panels that are lifted or pulling apart at the edges
2. Fasteners and Screws
If your roof uses exposed fasteners, the screws are where most problems start. Each one holds a panel down and seals the hole it made, so when a screw fails, water gets a way in.
There are three ways a fastener usually goes wrong:
- Backed-out screws: The screw has worked itself loose. It is no longer holding the panel down or sealing the hole, so it is failing at both of its jobs.
- Overdriven screws: The screw was driven in too tight during installation. It dimples the panel and cracks the rubber washer underneath. Some of this traces back to metal roof installation mistakes.
- Failed washers: The rubber washer under the screw head has cracked, hardened, or slipped out of place. The hole is now open to water.
From the ground, look for rust streaks running down from screw locations. That is usually the first visible sign that something is off.
Red flags to look for:
- Rust rings around several screws in the same area
- Screws sticking up above the panel surface
- Missing screws, where you can see a hole with no fastener in it
3. Seams and Overlaps
Seams are the spots where two panels meet, and the type you have decides what to look for. On a standing seam roof, the seams are raised ridges running up the slope, crimped or snapped together. On a corrugated or ribbed panel roof, the panels overlap each other with sealant tucked between them.
Here is what to check:
- Standing seams: Look for any seam that has opened or separated, especially near the eaves or the ridge.
- Panel overlaps: Make sure the laps have not pulled apart, and the sealant between the panels is still in place.
- Ridge caps: The cap along the peak should sit tight, with no lifted edges.
Texas sun is tough on sealant. Over time, it can crack and pull away from the metal, and even a hairline crack at an overlap can let in wind-driven rain.
Red flags to look for:
- Seams that are open, gapped, or separating
- Sealant that is cracked, dried out, or peeling away from the metal
- Ridge cap edges that are lifted or loose
4. Flashing and Penetrations
Flashing is the most common source of metal roof leaks. It seals every spot where the roof meets something else, like a wall, a chimney, a vent pipe, or a skylight.
Here is what to check:
- Pipe boots: The rubber boots around vent stacks crack and harden over time.
- Chimney flashing: Look for gaps where the flashing meets the chimney, and for dried caulk that has pulled away.
- Wall flashing: Check the line where the roof meets a vertical wall.
Check caulk and sealant around roof penetrations for cracks, gaps, or signs of deterioration. Repair damaged areas as needed to help prevent water from entering.
One thing trips up a lot of homeowners: a flashing problem rarely shows up as a drip right below it. Water travels along the underside of the panels before it falls, so a stain in the attic can appear several feet from where the water got in. If you want to know more, here is how metal roof leaks start.
Red flags to look for:
- Caulk that is chalky, cracked, or pulling away from the metal
- Rust around any flashing cutout
- Edges of metal flashing that are lifted
5. Valleys, Eaves, and Low Spots
The longer water sits on a roof, the more chances it has to find a weak spot. So this part of the check is about where water slows down or pools.
Valleys are the first place to look: the channels where two slopes meet. Leaves and twigs pile up there and hold water against the metal. Next, find any flatter areas where rain hangs around after a storm. Standing water like that is called ponding, and it’s rough on both panels and seams. Then check the lower edge of the roof for rust, lifted panel ends, or staining.
One more thing that’s easy to miss is two different metals touching. A copper fixture resting on a steel panel is a classic example, and over time the steel can corrode faster where they meet.
Here’s a simple trick: go back out a day or two after it rains. Damp patches or water lines that stick around usually point to a spot that isn’t draining well.
Red flags to look for:
- Debris piled up in valleys
- Standing water or dried water marks on the panels
- Rust or corrosion in valley channels or along the eave edge
6. Interior and Attic Check
The inside of your home can tell you things you’ll never see from the yard. If you can get into the attic, or reach the space just under the roof panels, grab a flashlight and take a slow look around.
Start with the wood. Water stains and dark patches on the decking, rafters, or framing mean something has been getting in. Check the tips of the screws poking through from above, too, since rust on those is an early sign of moisture. Then turn off the flashlight for a second. If you can see daylight through the roof boards, water can get in the same way.
Next, look at the insulation. If it’s wet or squashed flat, moisture has been getting in for a while. A musty smell or any mold or mildew tells the same story. And if you spot framing that dips or bows, don’t wait on that one. Have a roofer look at it.
Water doesn’t fall straight down from where it gets in. It runs along the rafters and framing first, so a stain in one spot can point to an entry point several feet away. Snap photos of anything you find and make a note of where it is. That makes it much easier for a roofer to trace it back to the source.
Red flags to look for:
- Fresh water stains or active drips
- Wet or compressed insulation
- Mold, mildew, or a musty smell
- Sagging framing or visible daylight through the roof boards
Prioritizing What You Find
Not every issue needs immediate attention, but some warning signs should not be ignored.
Act promptly: An active leak, fresh water entry, sagging roof structure, or a panel with a hole or rust-through needs prompt professional assessment. Multiple missing or backed-out fasteners and flashing that has separated from a roof penetration should also be assessed promptly.
Arrange repairs based on the condition: Cracked or separated sealant, surface rust around fasteners, and drainage problems should be evaluated before they worsen. The urgency depends on the extent of the damage, whether water is entering, and how quickly the problem appears to be progressing.
Monitor minor cosmetic issues: A small paint scratch without visible corrosion may only need monitoring and maintenance according to the roofing system’s guidance. Oil canning without leaks or other signs of damage does not automatically mean the roof has failed, but its cause and severity should be considered.
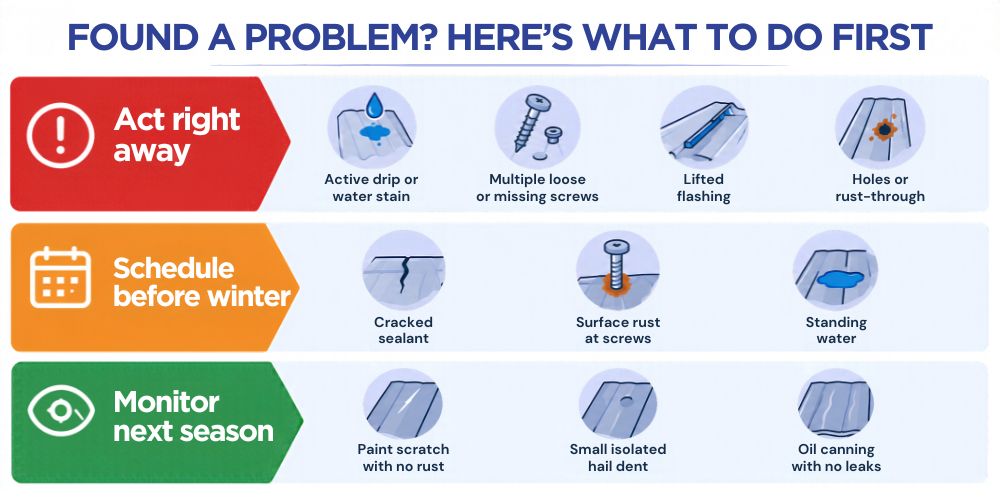
Use this table as a quick reference:
| What you found | Recommended action |
| Active leak, fresh water entry, or sagging structure | Seek prompt professional assessment |
| Multiple missing or backed-out fasteners | Arrange a prompt roofing assessment |
| Separated flashing or cracked sealant | Have the area assessed and repaired as needed |
| Surface rust around screws, with no active leak | Assess the extent of corrosion and arrange appropriate repairs before it spreads |
| Standing water or drainage problems | Arrange an assessment, especially if water remains or damage is visible |
| Small paint scratch without visible rust | Monitor and follow the roofing system’s maintenance guidance |
| Oil canning without leaks or other visible damage | Assess in context; appearance alone does not confirm roof failure |
Metal Roof Inspection and Insurance
Seasonal inspections can help homeowners document potential damage from hail and wind. If you suspect storm damage, check your policy and contact your insurer promptly. Claim reporting deadlines and requirements vary by policy.
A written inspection with dated photos can provide a useful record of the roof’s condition and when the damage was noticed. Keep this documentation with your insurance records if you decide to report a potential claim.
After hail or strong winds, dents, lifted edges, and other signs of roof damage may be worth checking closely.
How Much Does a Metal Roof Inspection Cost?
The honest answer is that it depends on your roof. Many roofing contractors offer free inspections, especially after a storm. Others charge a fee, and that fee changes with the job.
Three things mostly decide the price. The first is size and pitch. A big or steep roof takes longer to go over and needs more safety gear. The second is how busy the roof is. Lots of valleys, skylights, vents, or a rooftop HVAC unit means more spots to check. The third is what you want in hand afterward. A written report with photos can cost extra, and so can a quick patch if the roofer finds a small leak while they’re up there.
Some roofers also knock the inspection fee off if you book a repair or a maintenance plan with them. It’s worth asking. For a real number on your own roof, contact Mangold Roofing and ask what the inspection includes.
When to Call a Professional for a Metal Roof Inspection
You can handle a lot from the ground. Some jobs, though, are better left to someone who’s up on roofs every day.
Call a pro if:
- Your roof is steep, or your house has two stories. A close look isn’t worth a fall.
- There’s a stain or drip, and you can’t find where it’s coming from. Leaks are hard to trace, and guessing usually means fixing the wrong spot.
- The roof is over 10 years old, and no roofer has ever looked at it.
- You’re thinking about an insurance claim. A report with photos from a roofer gives you more to work with than your own notes.
- Hail the size of a quarter or bigger came through. It can dent metal panels, and you won’t always see that from the yard.
Not sure what you’re looking at? Mangold Roofing serves San Antonio and the surrounding area and can assess your roof’s condition and recommend repairs when needed.
Frequently Asked Questions
How often should a metal roof be inspected?
A metal roof should generally be inspected twice a year, once in spring and once in fall. It is also worth checking for signs of damage after a major storm. Regular inspections can help identify loose fasteners, damaged sealant, and other issues early, allowing you to arrange repairs before they become more serious.
What is the biggest problem with metal roofs?
Fasteners, mostly. On a roof with exposed screws, every screw is a small hole that depends on a rubber washer to stay sealed. Those washers dry out and crack in the Texas sun, and screws can back out over time. One bad screw is minor. A whole area of them is how leaks start.
How do you know when to replace a metal roof?
When the problems are spread across the roof instead of sitting in one spot. Rust that has pitted the metal, several sections that keep failing, or damage to the structure underneath all point toward replacement. One leaky flashing doesn’t. A roofer can look at the whole roof and tell you which situation you’re in.
How do I find where a metal roof is leaking?
Go inside first. Look in the attic for water stains or damp insulation, then follow them uphill toward the roof, since water often runs along a rafter before it drips. Once you have a rough spot, check the flashing, screws, and seams outside above it. If you can’t find it, call a roofer.
What maintenance do metal roofs require?
Not much, but it does have to happen. Look the roof over in spring and fall, keep debris out of the valleys, and check the sealant around vents and flashings every few years. Fix rust spots and loose screws early, while they’re small. Small problems are much easier to fix than big ones.